How I Migrated WordPress to a Static Website
January 19, 2019
development projects wordpressMy first project of 2019 was to migrate this 10+ year old WordPress website to a static website. For various reasons, the stack I chose is as follows...
- Static Website Generator: Jigsaw
- CSS Framework: Tailwind
- Website Hosting: Netlify
- Image Storage / CDN: AWS
- Comments: Disqus
- Version Control: Github
Now, I could have simply used a WordPress plugin that generates a static version of the site, but that seemed like I wouldn't get the full effect. I wanted the freedom of a static website - without hard dependencies.
Why Switch From WordPress?
Content not locked in a CMS, markdown can be ported to anything. Static website can be hosted anywhere without security or server or database concerns. Modern workflow/maintenance.
— andy brudtkuhl (@abrudtkuhl) January 15, 2019
- Portability
- Performance
- Security
- Workflow
Portability
Now that my content is all in markdown, I can migrate to any platform I wish. It's now version controlled and backed up at Github. A static website can be hosted anywhere - on Amazon S3, Netlify, Github Pages, or any cheap shared linux hosting. Setup? Just move the files.
Performance
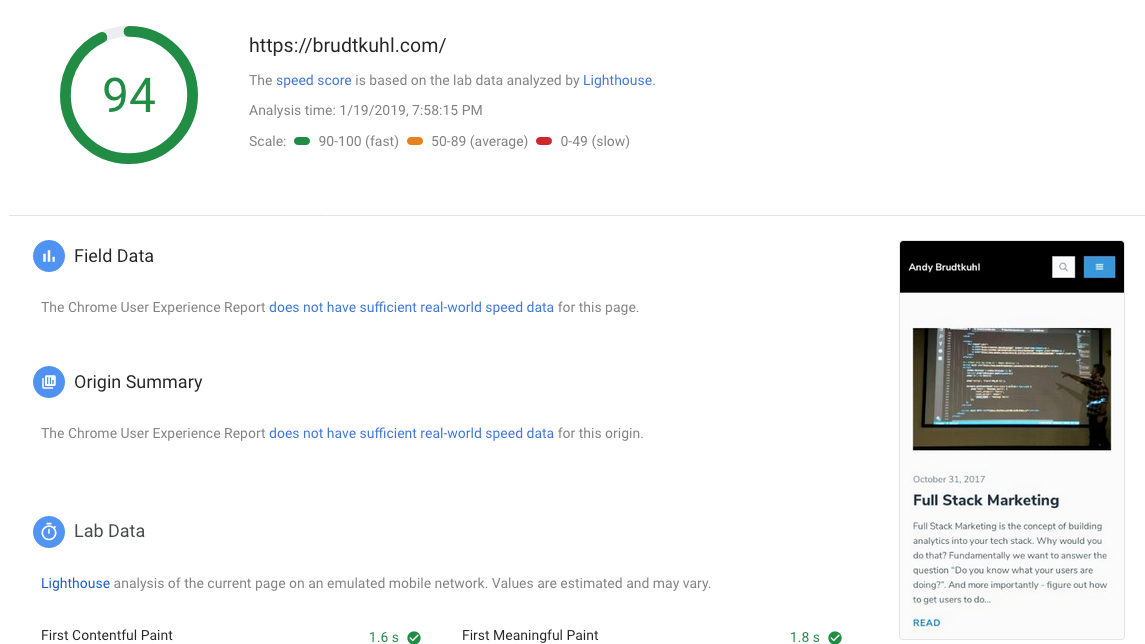
There was an obvious and effective performance bump instantly upon the switch. See the mobile benchmarks between my VPS-hosted WordPress website and my static website hosted on Netlify.
⏱Mobile performance improvements moving from WordPress to static site. Working towards 💯
— andy brudtkuhl (@abrudtkuhl) January 19, 2019
Security
There is no database. There are no logins to brute force. There is no SQL to inject. It's just HTML. It feels so good to not have to worry about any of that anymore.
Workflow
I like having my content versioned and in a git repository. I like editing directly locally, previewing the content, and pushing it to git. Then Netlify picks it up, runs the static generator build, and creates a static website served up by them. No FTPing needed. Just push to git and let Netlify's CI pipeline do all the work.
👍 So far, I'm loving having content in source control, hosted on @github
🚀 Also, pro tip ... you can export a @NotionHQ page to markdown to drop into the content repository, making it an excellent place to draft and archive content.
— andy brudtkuhl (@abrudtkuhl) January 16, 2019
Considerations
Moving from a database-backed Content Management System to a static website is not a trivial migration. There are a few considerations to think about before you dive in. See how I incorporate these considerations in the step by step walkthrough below.
- Image Hosting
- Comments
- Migration of Content
- URL Rewriting
- Forms
Step 1: Export Content and Uploads
The first thing you are going to want to do is export your content and uploads. The fastest way to do this is to use the built-in WordPress export functionality. With that, you will have an xml file with all the content from your database. Now, you just need to get all the content that you've uploaded. While there are some plugins to download your media library, the best best is just to fire up an FTP application and download them en masse. You don't need to download everything (althought it might not hurt to have a backup in case you change your mind). Just FTP into your WordPress website, and navigate to /wp-content/uploads
Download the entire directory to your computer.
Step 2: Images
In step 1, you downloaded your WordPress uploads folder to your local computer. Now comes your first consideration - what do you want to do with them? You can certainly incorporate them into your static website using a simple images directory. Since my static website will live on Github, I chose not to include images because I dont want them checked into a repository (for now). I do like the idea of everything being together, so I may reconsider this option in the future. Furthermore, when hosting on a platform like Netlify, you're static assets such as these will get served from their CDN.
For now, I am going to use Amazon Web Services S3 storage and Cloudfront CDN to serve the content. I made this choice because it's very cheap, you only pay for what you use, and I know how to use it. I created an S3 bucket, and uploaded the "uploads" folder I just downloaded from WordPress. Then I setup Cloudfront to use that bucket and map my [cdn.brudtkuhl.com](http://cdn.brudtkuhl.com) domain. Now, all my old WordPress images have the same path except running on Cloudfront at https://cdn.brudtkuhl.com/uploads/... This will make for an easy find/replace when we move on to Step 3.
Step 3: Content
This step took the longest. In step 1 we exported our content, but that was just the beginning. Almost all the static site generators out there use a document format called Markdown to store content and render web pages. I needed to figure out how to migrate my WordPress content to markdown. And then I needed it to populate the front matter, the YAML configuration that adds meta data to Markdown pages.
After several attempts at conversion using plugins and scripts, I stumbled on an export tool for blogger written in Node. I forked it and am now working on making it generate the proper YAML front matter meta data for Gatsby, Jekyll, Jigsaw, and Hugo using a standard WordPress XML export file.
After all that work, I thought there should be a much easier way. If running node scripts to migrate WordPress content to markdown is too much work for you (it was for me), I created WP2MD. For a small fee, you can upload your WordPress XML export file and download your website converted to markdown.
Last step with the content... Once you have converted it to Markdown lets find/replace all those image and file urls that are in your content. Find [mysite.com/wp-content/uploads/](http://mysite.com/wp-content/uploads/) and replace it with mysite.cloudflare.net/uploads/
Now, all your images are loading from your CDN.
Step 4: Static Site Generator
I learned to be a web developer starting with good old fashioned static websites hosted on Geocities and cheap hosting. The kind of static websites where if you wanted to change your footer, you had to make the change on all 245 pages on your website. Obviously, this time around I wanted to use a generator tool for that. There are all kinds of great ones like Hugo, Jekyll, Gatsby, etc. I have some history, building light weight e-commerce website on Jekyll. Since I've been using Laravel exclusively recently for web app development I thought I'd give Jigsaw a chance. I love it.
With some tweaking of my WordPress to Markdown script, I was able to migrate WordPress meta data to Jigsaw's YAML front matter and convert the publication date to the preferred date/time format.
Step 5: Comments
If I didn't have a decent supply of quality community in the comments section, I'd have just not used comments on this new site. But, there has been enough questions answered in the comments section to warrant the time needed to figure out how to incorporate a discussion system intro this static website. With no database, it's real hard to manage discussion threads associated with blog posts without a lot of manual effort to publish email and form replies. I needed to figure out how to port the WordPress comment system over to a static website.
I'm not a fan of Disqus for several reasons (tracking, data, performance), but under the circumstances - free and easy - I went with it. The migration was pretty easy... I just imported the WordPress XML Export file that we created in Step 1. That's it. Well, almost...
Step 6: Redirects
Since I'm going old skool on a static website, I wanted to replicate the structure. So, URLs changed and blog posts get filed under /blog now, I wanted to setup some redirects. How? Well, that sometime depends on your host and your static site generator. Many times, a simple .htaccess file will do the trick. In this case, I wanted to use Netlify's redirect system. Updating the .toml file and managing it seemed clunky. I opted for the _redirects file.
My quick fix was to create a Listener in Jigsaw that copies the file to the static output `build_production' folder.
✅ Create a listener pic.twitter.com/cTIkIDPPSQ
— andy brudtkuhl (@abrudtkuhl) January 19, 2019
But, then got some advice to make that part of the webpack build. Much better solution, in my opinion.
🙌 Yea i didn't like the redirect syntax in the toml file ... wanted something more .htaccess-y .... However, I do like the webpack solution to moving _redirects much better. Think I will use that instead. Thanks!
— andy brudtkuhl (@abrudtkuhl) January 19, 2019
So about those comments... Disqus uses the url as an identifier to know which comments to load on which page. I changed the URLs. Turns out, I'm not the first person to have this problem. They have various ways to solve this, including uploading a CSV file. But, since I had already setup the 301 redirects using Netlify, I was able to use their "re-crawl" functionality that would follow the 301 redirects and update their database with the proper destination.
Conclusion
I'm extremely happy with this move. Jigsaw has been a great platform to work in. I love using Tailwind CSS to design everything. I absolutely love writing in Markdown. Oh - and I save about $300/yr on hosting a better website.